Category Archives: Food

Going Big: The Avocado Bacon Burger

By Guest Contributor: Mike Majlak

Life on a Couch

Congratulations, its a monster.

GET THESE THINGS
One pound 85/15 ground beef
One package thick cut hickory smoked bacon
One whole avocado
One head of romaine lettuce
One vine ripened tomato
One package Cheddar Jack cheese
Two potato rolls or hamburger buns
Montreal Steak seasoning
Mayonnaise (optional)

Moderation wasn’t something that ever came very easily to me. My mom always tried to warn me against having “too much of a good thing” but it generally fell upon deaf ears. I didn’t want one solid piece of art- I wanted Notorious BIG posters on every, single part of my bedroom wall. And even as an adult, this is still the way I am. I don’t have a halfway setting. I’m either going big- or I’m going to sleep.

The way I think about and prepare food follows this same pattern. So when it came time to write a post for Shawny and Life on a Couch, I wanted to do an over-the-top creation based on my favorite plate in life- the all-American beef cheeseburger.

Life on a Couch

Press your own fattie!

I started with some really fresh, not-so-lean 85/15 beef from the local market. The modern health craze we see before us everyday is great- just not for burgers. Every time I eat a “lean” burger I liken it to eating cardboard. Besides, my grandfather Pop-Pop ate 80/20 burgers all day and he made it to a ripe old 91. Eat what you want, just run a little more is my theory.

Anyways- I shaped the meat into some half-pound snowball patties. I like to leave ‘em a little fatter as opposed to squishing into true patties to keep that homestyle feel. I then gave the burgers a GENEROUS (read: anti-moderate) rub of my go-to Montreal Steak seasoning and stuck them under the broiler. I live in Connecticut and there’s no way I was going out to the grill. If you live somewhere where it’s super-warm right now: 1) use your grill and 2) I’m jealous and I don’t like you until May/June.

Life on a Couch

Don’t wimp out.

As the burgers broiled, I started thinking “How do we bring this thing to the next level?” And the answer was obvious- thick cut hickory bacon. Moderation would say two slices per burger, so I figured we would go with four. Broil up the bacon and put it to the side (you can even do this before the burger to get it over with).

Life on a Couch

No caption needed here.

Now how do we really step this up? I figured about 2-3 slices of really thick Pepper Jack Cheese (I used some from Cabot that was amazing) would be logical. And then right when you started to get overwhelmed- BOOM! Open up an avocado and cut it into not-so-modest slices. If you want this burger to be super-burly, chop up some lettuce, tomatoes and prep some mayo also.

When the burgers start to approach your desired temp (I hope you like medium-rare), toss the cheese on top and let the broiler start to do its work. Now grab a couple potato buns and toast them just a bit. This is the one place moderation IS a good thing. Nobody likes a burnt bun.

Life on a Couch

Prep now, smile later.

Check out the picture. Follow my stacking order OR choose a different way. The danger level on eating this thing is probably a 9/10 so maybe eat over a plate (don’t be a slob). Luckily for me, I ate the burger over my Sactionals which have machine-washable covers 🙂

Life on a  Couch

Like reverse Jenga, with food.

Hopefully this avocado bacon burger brings you some happy summer thoughts to brighten your mood. If you really wanna follow my no moderation lifestyle, pair this bad boy with some waffle fries and a chocolate shake. After all, it is the middle of winter. If you start to feel chubby, just put on some sweats and call it a day.

Life on a Couch

Mike Majlak in the Rockies.

Mike Majlak is a published food fanatic/adventurer/photo-junkie. Follow his antics on Instagram @heybigmike.

Did you give this thing a shot?! Let me know in the comments!

– Shawny

Explain it Like I’m Five: Thanksgiving Apple Pie

By Mike Majlak

Let me start off by saying- I don’t cook. I’m the classic man. If you gave me a few frozen burgers, I could grill ‘em up and they might just be edible. But if you put me in charge of say, a lasagna- things might not turn out too well. Baking, especially, is something I have no clue about but I am eager to learn. To start off, I will need to buy all the right equipment. Luckily websites like The Buyers Impact (more here)review all different kinds of products so I could find the best tools.

That being said, the culinary craft is not lost in my family. My mom Robin (the same mom who brought you the ultimate Macaroni n Cheese walkthrough) is constantly trying to teach me a thing or two about her passion. She invited me back into her kitchen to showcase the perfect apple pie to gobble on right before you slump down into your favorite couch for your annual L-tryptophan sponsored sleep session.

Slice it up and enjoy!

First she sent me to the grocery store to pick up some ingredients. Between scrolling Instagram and text messaging, I was somehow able to grab them correctly on the first try:

Ingredients
4 pounds Granny Smith apples, peeled, quartered, and cored
1 teaspoon lemon zest
1 teaspoon orange zest
2 tablespoons freshly squeezed lemon juice
1 tablespoon freshly squeezed orange juice
1/2 cup sugar, plus 1 teaspoon to sprinkle on top
1/4 cup all-purpose flour
1 teaspoon kosher salt
3/4 teaspoon ground cinnamon
1/2 teaspoon freshly ground nutmeg
Pie Crust (follow recipe below)
1 egg beaten with 1 tablespoon water

Granny Smith!

apple pie recipe

Preheat the oven to 400 degrees F.

Cut each apple quarter in thirds crosswise and combine in a bowl with the zests, juices, 1/2 cup sugar, flour, salt, cinnamon, and nutmeg.

apple pie recipe

apple pie recipe

apple pie recipe

Roll out half the pie dough and drape it over a 9- or 10-inch pie pan to extend about 1/2-inch over the rim. Don’t stretch the dough; if it’s too small, just put it back on the board and re-roll it.

apple pie recipe

Fill the pie with the apple mixture. Brush the edge of the bottom pie crust with the egg wash so the top crust will adhere. Top with the second crust and trim the edges to about 1-inch over the rim. Tuck the edge of the top crust under the edge of the bottom crust and crimp the 2 together with your fingers or a fork. Brush the entire top crust with the egg wash, sprinkle with 1 teaspoon sugar, and cut 4 or 5 slits.

apple pie recipe

apple pie recipe

Place the pie on a sheet pan and bake for 1 to 1 1/4 hours, or until the crust is browned and the juices begin to bubble out. Be sure to leave slits in crust exposed to allow moisture to vent out! Serve warm.

Pie Crust:

12 tablespoons (1 1/2 sticks) very cold unsalted butter

3 cups all-purpose flour

1 teaspoon kosher salt

1 tablespoon sugar

1/3 cup very cold vegetable shortening

6 to 8 tablespoons (about 1/2 cup) ice water

Pulse!

Dice the butter and return it to the refrigerator while you prepare the flour mixture. Place the flour, salt, and sugar in the bowl of a food processor fitted with a steel blade and pulse a few times to mix. Add the butter and shortening. Pulse 8 to 12 times, until the butter is the size of peas. With the machine running, pour the ice water down the feed tube and pulse the machine until the dough begins to form a ball. Dump out on a floured board and roll into a ball. Wrap in plastic wrap and refrigerate for 30 minutes.

apple pie recipe

Cut the dough in half. Roll each piece on a well-floured board into a circle, rolling from the center to the edge, turning and flouring the dough to make sure it doesn’t stick to the board. Fold the dough in half, place in a pie pan, and unfold to fit the pan. Repeat with the top crust.

Yield: 2 (10-inch) crusts (top and bottom)

I wish I could take some credit for the baking that was involved in this pie, but I really can’t. Instead I’ll take this time to personally thank all the beautiful mothers out there who make Thanksgiving dinner so easy on all us guys. Love ya mom!

Thanks to guest contributor Mike Majlak for sharing with us. Do you usually bake your own Thanksgiving Day dessert?! Let us know in the comments!

–Shawny, Founder of Lovesac & Life on a Couch

8 Strange Candies You Won’t See Trick-Or-Treating

By Mike Majlak

We all remember the excitement that built up around Halloween when we were kids. Trying on costumes, carving pumpkins, maybe even a haunted hayride- all added to the anticipation surrounding many children’s favorite holiday. Now as adults, much of that excitement comes from “manning” the door and handing out candy to children that might remind us of a time when life was just a little more carefree than it is now.

Happy Halloween!

Carving pumpkins is just so hot right now.

The night of Halloween itself, when most kids go trick-or-treating, holds the highest level of tradition, ritual, and intrigue. Every time the doorbell rings and we must pry ourselves off the beloved couch, we feel just a little bit of that youthful energy so freely exhibited one crisp night each and every autumn.

Much of the excitement for adults on Halloween comes along with choosing which candy we will hand out to the kids of the neighborhood. We all remember being kids and how we loved Old Miss Winters for giving out King Size Snickers bars- or how we skipped right past the next-door neighbor Frank’s house because he just gave out those stupid Smarties that nobody could possibly like. There have always been the Halloween mainstays- the Snickers bars, the candy corn, the Sweet Tarts. But here are 8 strange candies that you may not have ever seen- and maybe for good reason…

8. Sigmund Freud Head Pops
Lollipops shaped to look just like Sigmund Freud and taste like watermelon- but operate free of any of those pesky copays or sticky coinsurance situations.

Come lay on the couch!

Sigmund Freud Lollipops


7. Chicken Sucker Candy
A lollipop in the shape of a rotisserie chicken that has a very strange orange flavor and eerily offers none of the same protein advantages as your normal chicken breast.

Wait, is this cooked thoroughly?

Chicken Sucker Candy


6. Forked Eyeball Suckers
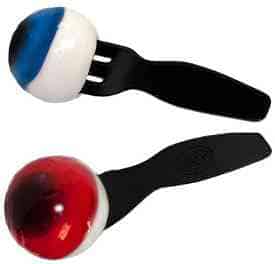
Not really sure who’s idea this one was, but it’s pretty gruesome. Cherry and raspberry flavored eyeballs on the end of a popular kitchen utensil begs the question- “What the fork?!”

Hey man, you got something in your eye. It's a fork.

Forked Eyeballs Candy


5. Idaho Spud

Ok, so this one really isn’t that strange. A chunk of chocolate filled with marshmallow and sprinkled with coconut. I could actually go for one of these right now…

IMG_5644

Idaho Spud Chocolate


4. Zombie Food Chocolates
Small morsels of milk chocolate molded in the shape of human brains, feet, and anatomically correct hearts that ooze red caramel when bitten into. These are sure to satisfy the Walking Dead fan in the family.

FEED ME BRAINS!!!

Zombie Food Chocolates


3. Box of Boogers Gummies
A terrifyingly disgusting box of gummies that pushes the envelope of what is even edible. They even feature three distinct flavors: Snottermelon, Sour Green Boogy, and Lemon Loogy. If you somehow have these for Halloween, you picked a real winner! If gummies are your thing but you’d prefer something a bit more healthy and beneficial for your body, you might want to shop at Green Roads for their edible CBD collection.

This is just downright disgusting.

Box of Boogers Gummies


2. Gummy Flesh Fries
Watermelon flavored gummies made to resemble sawed-off human fingers. You may want someone to offer you a “hand” with eating these. I guess that’s not really that funny. Whatever.

Can I have some ketchup please?

Flesh Fries Gummies


1. Meatball Bubble Gum
And coming in at the number one spot is bubble gum that tastes like bubble gum- but looks like meatballs. Yes, like meatballs.

Just like mom used to make!

Meatball Bubble Gum


Thanks to guest contributor Mike Majlak for bringing these ridiculous candies to Lifeonacouch.org. Would you ever try any of these? Let us know!

–Shawny
Founder, Lovesac & Life on a Couch


Family Couchday 2.0

Guest contributors Romy Raad and Natalie Neumann (Rad & Neu) are culinary adventurers who look at food the same way we look at the couch- as something that promotes happiness and brings us closer together. We are pumped to feature them here- head over to their blog for full version of this story (with recipes!) and a ton of other intriguing foodventures!

Shawny Nelson

We, Romy and Natalie from radandneu.com, were absolutely thrilled to spend a funday with Shawny and his family in his beautiful countryside farmhouse!

Couching n’ Snacking was the theme of the day – by joining forces we created a joyful family outdoor experience, featuring four of our healthy, kids-friendly radcipes and some fabulous Lovesac products.

Kids cooking Kids cooking Kids cooking Kids cooking

We prepared the snacks together with the kids, who discovered the fun of cooking as a team, while learning how each ingredient adds some magic to the plate.

Thanks to Shawny’s outdoor lounge setting, a regular couch afternoon was turned into a beautiful and lively outdoor experience – enjoying delicious finger foods with a side of sea breeze.

Lovesac Outdoor Sactionals Lovesac Outdoor Sactionals Lovesac Outdoor Sactionals Lovesac Buddah Bowl

The detailed recipes for the healthy bites can be found on our blog www.radandneu.com alongside other rad&neu insights!

Couch Food: 7 Steps to Mac & Cheese Perfection

We’re all just looking for a little bit of comfort. [Guest contributor: Michael Majlak]

As someone who truly believes that a good meal can transform the human soul, I’ve been spoiled with a mother who can really kick it up a notch in the kitchen. I probably never really gave her the appreciation she deserves for creating some insanely impressive homemade dishes.

Dig in!

Comfort on a plate

It’s one of those cliché arguments you have with your friends as a kid, and I couldn’t imagine it any other way. Every child should go through their adolescence thinking that their mom is the best cook in the entire universe. I can remember almost getting into physical fights with other kids that thought their mom made better meatloaf than mine!

One dish my mom has had perfected since my birth was this gooey, ridiculously delicious Mac & Cheese. Since we’re quickly slipping into the season for food that will keep us warm, I thought now would be the right time to bring you the recipe for a plate that anyone can make- and EVERYONE will enjoy. My mom, Robin, walked me through the whole process in 7 simple steps and I’ve laid them out below with some pictures to get your mouth watering just a bit. Throw on some sweatpants, follow the recipe, and bring a big bowl of this cheesy masterpiece back to your couch for an ultimate comfort session!

Just don’t try to say yours came out better than my mom’s…

SO MUCH CHEESE!

Gather your ingredients

Robin’s Mac & Cheese aka: the ultimate comfort food!

  • 1 lb. Cavatappi Pasta
  • 6 oz. Gruyere Cheese
  • 1 small onion
  • 12 oz. New York Extra Sharp Cheese
  • 3/4 stick butter
  • 1 tsp. fresh ground nutmeg
  • 1 tsp. fresh ground black pepper
  • Salt to taste
  •  2 cups milk
  • 3 Tbs. flour
  • 1/2 cup Panko Crumbs
The beginning of something great!

Boil some pasta

  1. Preheat oven to 375º
  2. Bring water to boil in large pot; add a splash of olive oil, cook pasta until almost cooked.
  3. Grate cheeses, nutmeg and chop onion.
  4. Melt butter in saucepan add finely chopped onion, cook slowly until onion is translucent. Add flour to butter/onion mixture and heat over low for 2 minutes stirring constantly.
  5. Heat milk in separate pan or microwave until hot.
  6. Add milk to pot with butter & onion and whisk until hot [do not boil]. Add cheeses, nutmeg, salt & pepper to mixture. Blend well and when smooth pour cheese sauce over pasta in casserole dish. Top with Panko, salt and pepper.
  7. Bake 30 – 35 minutes or until golden brown and bubbling.
Gooey, cheesy goodness.

The money shot

Bout to get crusty!

Sprinkle, sprinkle, sprinkle that Panko

Just eat it all, who cares.

Bake it to crusty perfection

Enjoy!

— Michael Majlak


A Ribeye Bullseye: Grilling the Perfect Steak

The debate is heated when it comes to what the tastiest food is to grill during the summer months. Some will say burgers, others will say barbecue chicken- but its hard to deny the searing argument from those who say it is a good hunk of steak. For some people, nothing beats cooking a big juicy steak on their bbq for their friends and family to enjoy. But if steak isn’t their number one choice, then meat grinding their perfect slice of meat could ensure that you cater to everyone’s preferences. You just need to make sure you have the best equipment to do this, like a meat grinder machine for your kitchen. However, steak still seems to be at the top of the list for all meat lovers though. Vegetarians aside, many people consider steak to be the epitome of “good eats”. Full of flavor and hard to resist, this simple to grill item still gives many people a tough time to cook. So here’s a simple guide to grilling a perfect steak to enjoy this summer:

Ribeye Steak

26oz Bone-In Ribeye

Step One: The first step to grilling the perfect steak is actually in choosing the perfect steak. People have all kinds of notions and beliefs about what the best cut of steak is. You have people that love Porterhouse because it has two full cuts on it. You have people that love the tenderness of filet mignon. But a true steak aficionado will tell you that the steak-of-all-steaks is and always will be the bone-in ribeye. The fat content and marbling in a thick cut ribeye is second to no other cut. Go to your local butcher or higher-end market and buy a 1.0-1.5lb USDA certified prime bone-in ribeye. You can go a little bigger or smaller depending on how many you’re feeding, but figure a 1/2-3/4 pound serving size is pretty good.

Season it up!

Montreal Steak seasoned ribeye

Step Two: The next step in the process is pre-heating the grill and seasoning the steak. Go out a little early and turn your grill on high heat, clean the grates, and close the top. This will allow the grates to get nice and hot before you drop the steak on. After turning on the grill, move onto seasoning the steak. Once again, people do this in a bevy of different ways. I personally choose a simple yet guaranteed-to-please method- a dry rub of McCormick Montreal Steak Seasoning. You can buy Montreal Steak Seasoning at just about any grocery store, and you want to be pretty generous with the application. You still want to be able to taste the meat, but don’t be scared to coat this stuff on because it will result in great flavor enhancement. Another way to add to the flavor of your steak is by using BBQ wood pellets with different smoke flavors. If you’re looking for a rich, smoky flavor without using anything artificial these are a great idea.

Grill it up!

Grill over medium-high heat

Step Three: The third step is the fun part aka the actual grilling part. Bring your seasoned steak and a fork out to the grill. Bump your heat up all the way to high and drop the steak on for about a minute. Then flip the steak to the other side for another minute. This quick “flash sear” will create a seal and allow the steak to retain its flavorful juices, essential to grilling the perfect steak. Now drop the heat to medium-high and turn the steak 90 degrees to create those sought-after diamond grill marks. Close the top and grill for about 7-8 minutes. This grilling time is based on a two-inch thick cut but times will vary for other thicknesses. There are endless sites like one from Omaha Steaks that will direct you to cooking times, or take it to “The Google” if need be. After 7-8 minutes, flip the steak and grill the other side for about 8 more minutes. This should give a two-inch thick ribeye a perfect medium-rare temperature. Depending on your preference and your grill, times can be shorter or longer. Just use a trial-by-fire (no pun intended) approach!

Let it stand!

Allow the steak to stand

Step Four: This step is often overlooked but its so simple and it needs to be addressed. After you take your steak off the grill, allow it “rest” for 10-15 minutes. This will ensure the juices have settled into the steak before you cut into it. This is also the optimal time to prepare some sides and a cold drink to enjoy your steak with. You’re almost done, just one more step!

Go to town!

The perfectly grilled steak for your summer barbecue

Step Five: The final step in the process is choosing and prepping your sides. My surefire steak sides have always been a baked potato and broccoli, but this can be altered to your taste. Nowadays with the push for clean-eating, some people have abandoned starch (and their carbs) altogether and opted instead for two veggie sides or a big salad. Get creative and do whatever works for you and your people! We used a garlic mashed potato and asparagus medley as our sides along with a chop salad and a pitcher of cool lemon water! Now it’s just a matter of finding a nice comfy place to sit and enjoy the spoils of your labor!

Dinner on a couch!

Family dinner

At the end of the day, people will continue to argue about the best food to enjoy during the summer. It just comes down to personal opinion. Some will say burgers, some will say dogs, some will say steaks. But no matter what you decide to grill and how good it actually comes out tasting (we’re not exactly pros right?) there’s nothing better than sitting under the setting sun enjoying time with the people you love. That’s life on a couch.

— Shawny